
)
)
A while ago, we bought a glide rocking chair because it was cheap and I’ve always wanted a rocker. Recently, my husband found a gliding footstool someone had left behind (as often happens here). The wood was almost the same colour as the rocker, so he suggested we re-upholster the glide rocking chair and stool to have a matching set.
Two trips to Fabricland later, we had two and a half meters of upholstery fabric. On Saturday, I decided to re-upholster the glide rocking chair. Eying the cushions, it seemed like a simple matter: remove current cover, use that to cut out a new cover, sew, install on chair, done!

Of course, if you’ve done any DIY or sewing projects, you already know it wasn’t quite that easy. I had to juggle three girls and figure out a few sewing hurdles I hadn’t thought about when I started. For example, I decided instead of sewing the new covers closed, I wanted to be able to take them off to wash them. (I did remember to pre-wash the fabric so that I could do this.) This involved some figuring and extra sewing…
That extra sewing cost me some time, so for my next reupholstering project, if I end up having to do a few more steps than originally planned, I might consider getting upholstery fabric by yard online. This way, I can at least figure out the challenges without any extra car trips.
How to Re-upholster a Glide Rocking Chair
1. I stopped my seam about two inches from the bottom of the cushions, then turned and sewed a double-hem (because the fabric frayed very easily) along the side of the cushion from the seam to the bottom.
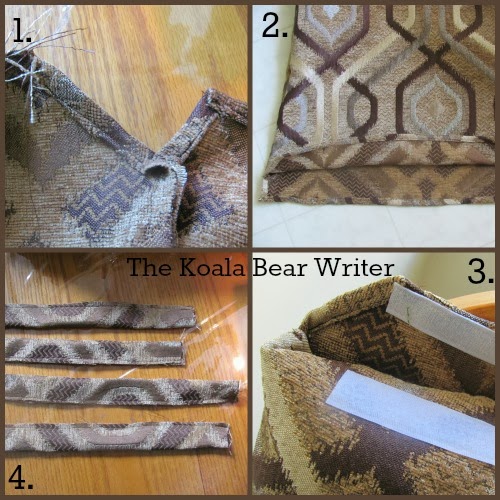
2. I hemmed the long edge of the bottom of the cushion as well. I made the corners of the back square and the corners of the front on an angle.
3. Tucking the back, square corners in around the edge of the cushion, I folded the front flap over towards the back. Here, I used self-stick velcro, because I could just peel off one side and stick it to the top flap where I wanted it, then peel off the other side and simply fold the top flap down to stick the other side of the velcro. Then I sewed the velcro as well.
I repeated these steps to sew the bottom cushion. It was amusing to note that the last person to own the chair must have also attempted to re-upholster it, although they used thin brown sheeting to do it. The stitching was rather amateur and easy to rip out, but the old covers made a great template for cutting out new covers. I tried the bottom on the cushion, then restitched it in a couple places to make it fit better.
4. From the scraps, I cut out a few long, thin pieces to make ties. I sewed down the long end and then one short side and then turned them inside out. My thumbs were sore after doing four ties (two to sew to the back corners of the bottom cushion to tie it to the back of the rocker; two to sew to the bottom corners of the top cushion; and two to sew to the middle of the top cushion to keep it from flipping forward) so I still have two ties left to turn and sew on.
How to Re-upholster a Glide Rocking Chair’s Stool
Re-upholstering the gliding footstool was much easier. We used a screwdriver and pliers to pull the old staples out. I measured the square of fabric used to cover it, then threw the cover and old foam out. We had a new piece of foam to put on the footstool and I cut a newsquare of upholstery fabric to cover it.
I sewed a double hem in all four edges of the cushion, then my husband helped me pull and staple the new cover around the quilt batting and the top of the stool. We screwed it back onto the base and presto! we had a matching rocker and stool.

I’m quite happy with the results of my re-upholstering project. The ironic thing is that the upholstery fabric cost more than the chair itself did (even on sale for half price), but I think it will last much longer. We choose that fabric because the dark brown stripe matches our futon. I’m going to sew a couple throw pillows from the scraps and now we have coordinating living room furniture.
Looking for more ideas for your glide rocking chair? Check out the way that the DIY Mommy updated a nursery glider rocking chair. She offers tips for repainting your chair as well as completely re-doing the cushion for a new shape. I hope both of our projects inspire you!
Have you ever attempted to re-upholster a glide rocking chair or stool? Do you like shopping sales and thrift stores or do you prefer to buy new furniture?
4 Comments
Ok so when are you coming to my house to do mine! lol You did a great job!!! It looks awesome! Unfortunately, I have no sewing skills and that project would be WAY over my head! lol
Hahaha! 🙂 Yeah, it was fun to do once in a while but not something I really plan to make into a hobby. 🙂
LOVE IT! So easy to give furniture a make over. From what I hear, I have yet to try it myself. Thank you for linking this post up at homemaker monday.
My mom re-upholstered our furniture when I was growing up – both our old hide-a-bed and some other furniture that basically required new cushion covers – so that gave me courage to attempt this. 🙂 I could always call her and say “Heeeeeelp!” if I had to (but I didn’t).