Since arriving on the scene in the last decade, the Instant Pot has revolutionized the kitchens of homes across North America and beyond. From reducing cooking times to allowing users to spend less time in the kitchen cleaning tons of pots and dishes, it’s no wonder that the reviews of this appliance have been consistently good. My Instant Pot has certainly lived up to my expectations and more!!!
But when you first get your Instant Pot, there are some differences you need to understand to make sure you can cook your favorite recipes to perfection, every time. I’m still figuring out some of these—because yep, we’ve eaten burnt chili when I tried to make my mother-in-law’s recipe in my Instant Pot instead of my slow cooker. Read on for ways to make your favourite recipes work in your Instant Pot.

Instant Pot Cooking Modes
First, it’s a good idea to get familiar with all the different cooking modes you can use on the Instant Pot. Did you know there’s a specific yogurt setting just for making amazing yogurt in your own home? I turn a gallon of milk into a tub of yogurt every two weeks or so and it’s easy peasy.
The “Manual” setting (also called “Pressure” on some models) is the main way to cook, but other functions include Saute and Slow Cook.
With the other modes, the Instant Pot often uses pressure cooking under pre-set temperatures, timings, and pressures to cook different styles of food. For example, there’s a “bean” setting for making chickpeas and black beans, which I also use frequently.
Timing
You’ll find a ton of tips and tricks for adjusting the Instant Pot cooking times for different recipes. The good news is, it’s almost always a much shorter cooking time, such as this Instant Pot Orange Chicken which only takes 15 minutes (that’s including prep time!). I love using my Instant Pot when we’ve had a busy day and I don’t have an hour to wait for something to cook in the oven.
But if you’re trying to convert a traditionally cooked recipe for the Instant Pot, here are some handy guidelines:
For Stove Top or Oven Recipes:
Simply divide your recipe’s cooking time by three and use the new number on High Pressure in the Instant Pot. This works best for things like soups, meat, and vegetables.
For Pasta Recipes:
Take the lowest number in the time range suggested on the packet of pasta. Cut that time by two-thirds. Of course, some people prefer pasta “al dente,” so this is one where a little trial and error may be needed to cook the pasta to your taste.
Slow Cooker Recipes:
If you’re looking to speed up a slow cooker recipe, simply take the recipe time and convert into minutes (multiply the time by 60) and then divide that time by 10 to see how many minutes the recipe will need on High in the Instant Pot. So a recipe that takes 8 hours to cook would be 480 minutes, divided by 10 for only 48 minutes in the Instant Pot.
Water
No matter what recipe you’re converting, the Instant Pot needs water to correctly cook your food. That’s because it needs to build pressure by converting that water into steam.
If you fail to add water (or enough water) to the recipe, your food could burn in the pot. So, add at least half a cup of water every time. Recipes that I’ve had problems with have been a bit on the thick side, like my mother-in-law’s chili recipe. Adding more water or broth to the recipe helps make sure that the BURN! function doesn’t go off.

Dairy
Dairy, unfortunately, does not do well in the Instant Pot. It’s not a good idea to add milk, cheese, or cream during cooking in the Pot. It could also result in the dreaded “Burn” message. Either way, the texture, taste, and quality of your dish will be affected.
So, to be on the safe side, it’s best to add any creams, cheese toppings, or other dairy to your dish after it has finished cooking in the Instant Pot. For example, you might add cheese to the top of a dish and then grill in the oven for a few minutes once Instant Pot cooking is complete.
Pressure Release
You’re either going to be using Natural Pressure Release (allowing the Instant Pot to release the steam itself over time) or Quick Pressure Release (instantly release all pressured steam). Sometimes, you’ll use a combination of both.
Natural Pressure Release is best for starchy recipes, soups and other liquids, or tough cuts of meat. Quick Pressure Release tends to be better for pasta, fast-cooking veg, and more delicate cuts of meat.
Recipes You Shouldn’t Try
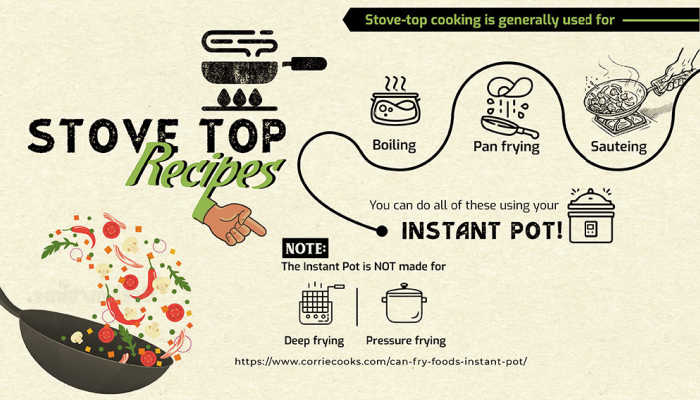
It can be tempting, especially when you’ve seen all the magical things your Instant Pot can do, but you should absolutely never deep-fry in the Instant Pot. It’s just not built for it and it would be extremely unsafe if anything went wrong.
Similarly, the Pot is not made for recipes that require anything to turn out nice and crispy due to the fact that it uses pressurized steam (which is still essentially moisture) to cook the food.
Don’t Over Fill
On the inner pot of your Instant Pot, you’ll see a line showing you how high your pot should be filled. Going over this line is a big mistake!
Overfilling the pot can end up closing your venting knob, which will create issues such as reducing the cooking pressure and creating a huge mess when you do eventually manage to release it. So, it’s important to always stick to that fill line!
Now that you have the basics down of converting your favourite recipes, which easy Instant Pot recipe will you start with first?


No Responses Yet