


I’m a huge fan of reusable grocery bags. My mom had a set when I was growing up, and over the years, I’ve also accumulated my own collection of cloth bags. I use them for all sorts of things, not just grocery shopping! They’re handy for trips to the library, carrying books and supplies to Sunshine’s violin lessons, or packing snacks for mom’s group.
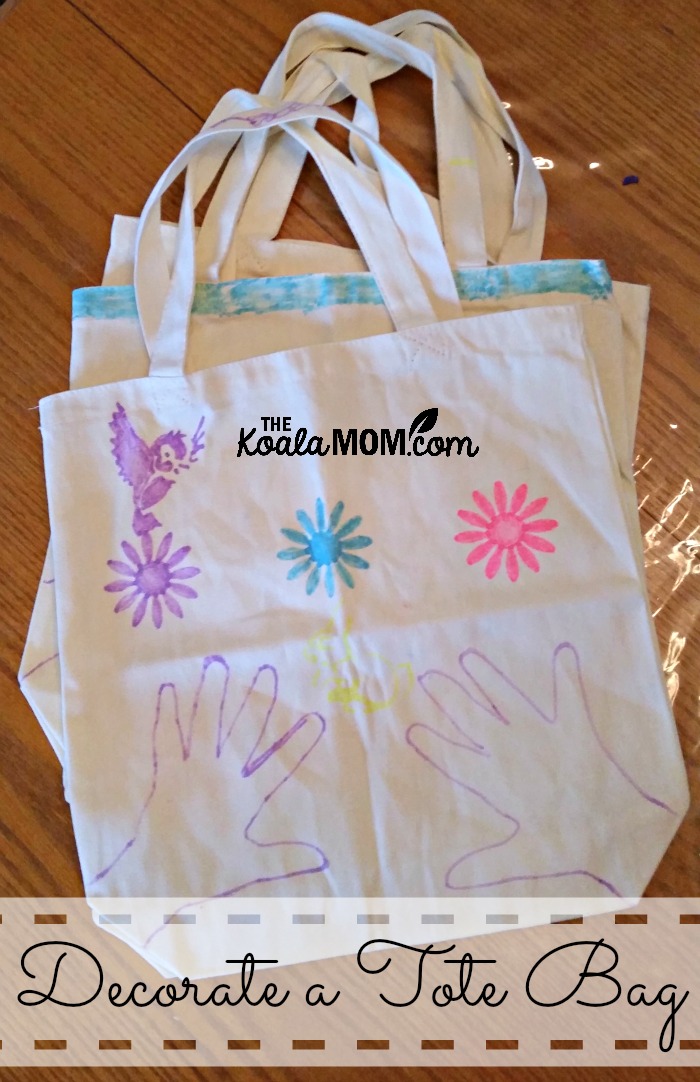
Since reusable tote bags are so practical, I thought they’d make a fun craft for the girls. Decorating a plain canvas bag with fabric markers is an easy kids’ craft that lets children get creative while making something they can actually use. The finished bags also make lovely handmade gifts for birthdays, Christmas, teachers, grandparents, or cousins.
I love crafts like this because they don’t require a lot of supplies or complicated instructions. Give the kids some markers and a blank canvas tote bag, and let their imaginations take over!
This post contains affiliate links; as an Amazon associate, I earn from qualifying purchases.
Supplies Needed to Decorate a Tote Bag
One of the best things about this DIY tote bag craft is how simple and inexpensive it is to put together. You only need a few basic supplies.
- Canvas tote bag — Choose a plain, light-coloured cotton or canvas bag that gives the children plenty of room to draw.
- Fabric markers — These are designed for decorating fabric and come in a variety of colours.
- Stencils (optional) — Princesses, animals, flowers, stars, and other simple shapes can help younger children get started.
You may also want a piece of cardboard to slip inside each bag while decorating. This helps prevent the markers from bleeding through to the other side. Check the fabric marker instructions for any setting or washing requirements before using the finished bags.
How to Make DIY Decorated Tote Bags
Did I mention this craft was easy? I laid a bag out for each of the girls, handed them some markers, and said, “Have fun.”
Okay, I also dug out a set of princess stencils someone had given us a while ago, because one set of these bags was destined to end up under the Christmas tree for their cousins.
If you’re doing this craft with your own children, you can let them decorate freehand or offer stencils for tracing. Older children may enjoy planning a picture or pattern, while toddlers and preschoolers might prefer making colourful scribbles, dots, and handprints.
Here are a few simple steps to get started:
- Prepare the bags. Lay each canvas tote bag flat on a protected work surface. Place cardboard inside to keep the markers from transferring to the back of the bag.
- Choose a design. Let the children decide what they’d like to draw. Offer stencils if they need a little inspiration.
- Draw with fabric markers. Encourage the kids to experiment with colours, patterns, pictures, and lettering. They can trace stencil outlines and then fill in the designs.
- Add personal touches. Names, handprints, flowers, hearts, favourite characters, and colourful patterns all work well. Each child’s bag will be unique!
- Let the bags dry. Follow the marker manufacturer’s directions for drying and setting the ink before using or washing the bags.
The instructions really are that simple. This is a great craft for a rainy afternoon, a playdate, a homeschool art activity, or a handmade Christmas gift project.
Decorating Canvas Bags with Kids
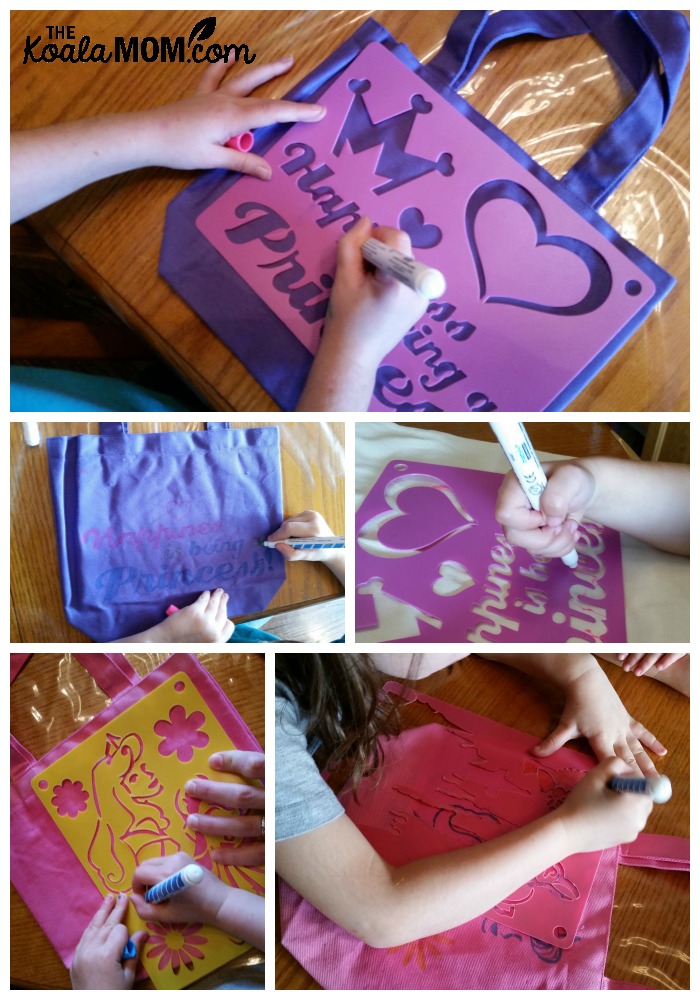
The princess stencils looked really cool on the bags. Even Jade (age 3) had fun using them, though hers didn’t turn out quite the same as her sisters’ designs. I helped her draw her handprints on her bag, and she mostly just scribbled.
Her bag was going to someone who would appreciate the scribbles!
That’s one of the things I enjoy about doing crafts with young children. They don’t have to produce a perfect finished product for the activity to be worthwhile. Toddlers can explore colours and practise holding markers, while older children can work on tracing, drawing, and creating more detailed designs.
If you’re crafting with several children of different ages, this activity is easy to adapt. Younger kids can decorate with handprints and simple shapes, while older siblings can use stencils, create pictures, or add their names. Everyone gets to make something of their own.
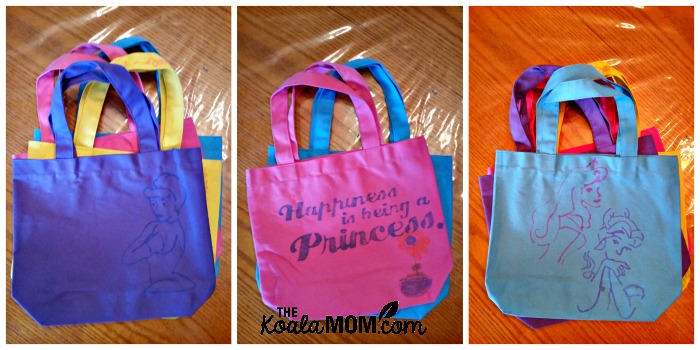
Sunshine (age 7) and Lily (age 5) spent quite a bit of time decorating their stencil scenes after they’d finished outlining them. In fact, they spent several hours working on their bags! Jade decorated one, while Sunshine and Lily each decorated three.
I was impressed by how much time they spent on this simple project. What started as an easy afternoon craft turned into an opportunity for the girls to experiment with their designs and add more details as they went.
Ideas for Using Your Decorated Tote Bags
One of my favourite things about this craft is that the finished bags aren’t just pretty to look at. They’re useful, too! Unlike some children’s crafts that end up tucked away in a drawer, a decorated tote bag can become part of everyday family life.
Here are a few ways to use your finished canvas bags:
- Reusable grocery bags: Let the kids help carry lightweight groceries in their own decorated bags.
- Library bags: Give each child a personal bag for library books, making it easier to keep their books together.
- Activity bags: Pack supplies for music lessons, art classes, sports, or other extracurricular activities.
- Snack bags: Use a tote to carry snacks, water bottles, and other essentials to playdates or mom’s group.
- Gift bags: Fill a decorated tote with books, art supplies, treats, or other small gifts for a birthday or Christmas present.
- Handmade gifts for family: Children can personalize bags for grandparents, aunts, uncles, and cousins.
- Homeschool bags: Give each child a bag for nature journals, pencils, notebooks, or other supplies for learning on the go.
You can even make this a family tradition by decorating new bags for different occasions or creating a set of matching bags for a family outing.
Another easy option for decorating tote bags is to use heat transfers instead of fabric markers. Kids can create bags with crisp, colourful designs using custom heat transfers from Best Price DTF. These transfers make it easy to add vibrant, durable designs to canvas tote bags, T-shirts, and hoodies. (This option does require more adult supervision, since applying the transfers involves using a hot iron.)
Other Things Kids Can Decorate with Fabric Markers
If your children enjoy decorating tote bags, you don’t have to stop there! Fabric markers can be used on many other fabric items, making them a handy addition to your craft supplies.
Try decorating:
- Dish towels for a handmade gift
- Aprons for little helpers in the kitchen
- Pillowcases with colourful patterns or favourite designs
- Plain T-shirts for a personalized wardrobe
- Hats for summer outings
- Drawstring bags for toys, shoes, or activity supplies
Always check that your markers are suitable for the fabric you’re using, and follow the manufacturer’s instructions for setting the design and washing the finished item.
Cost and Difficulty
Cost: Approximately $10–$20, depending on the tote bags, markers, and stencils you choose. If you already have fabric markers or stencils at home, you may be able to make this craft for less.
Difficulty: Easy.
Recommended age: Approximately 2 years and up, with adult supervision and age-appropriate supplies. Younger children will need more help, while older kids can work independently on their designs.
Time: Allow at least 30 minutes, although children may happily spend several hours decorating their bags, as mine did!
This is an easy, practical craft that combines creativity with something the kids can use every day. Whether you make a single bag for yourself or a whole collection of personalized tote bags to give as gifts, it’s a fun way to turn a plain canvas bag into something special.
Looking for more ideas? Browse the rest of my 31 Days of Useful Kids’ Crafts series for more creative projects that children can make and enjoy using.
No Responses Yet